Table Of Content
When you’re ready to start a project, scroll back up to the first screen I showed you and click on the big PLUS SIGN icon called “New Project” in the “My Projects” row. Alternately, you can click on the green “New Project” button in the upper right corner of the window. Learn how to upload images into Design Space, Cricut's design software. In this course, you'll learn how to upload an image of handwriting and then use it to make a personalized gift. Cricut Help Center provides a wealth of knowledge on Cricut Design Space.
How to: Use the Design Space® Layers Panel & Combine Menu
So look at how beautiful and clean that cuts. When we go back to Design Space, it knows that we’ve finished and it takes us back to this page. Now, if you wanted cut another one, you certainly could from this page, but usually what you’ll wanna do now is click on finish and immediately go save it. So I’m gonna show you right now. So I’m in the upper left corner next to like your machine selection.
Cricut Design Space New Project

So there is our trophy and it says I did it. So you don’t need any glue or tape or anything, and it goes right into the little corners like this. There’s a little bit of paper there. And all four corners, just like that. And you have a cute little frame with your name on it and I signed it.
How to Upload Fonts to Cricut Design Space
So this will be your certificate and it has two parts to it and one is my name. I’m gonna put my signature in here. And the other is the certificate paper. So grouping is an organizational thing, but it doesn’t really keep the things together on your mat. If you need to keep things together on your mat, you need to use attach.
How to use or create a Custom material setting
When I click on it again, it’s selected. Now when it’s selected, we have, you can see its measurements right here and right here on this side. We also have access to these four tools. All right, so if we, and you’ll notice that if you like make a change and go back up to here, you get another option. So you have save, and if you click save again, it’ll save on top of the one you have. Now, again, this one will be a little harder to get off the mat because it’s more detailed, but we do it the same way.
Cricut launches Cricut Joy Xtra, expanding its platform and cutting machine portfolio
And then you type your name, whatever your name is I’m gonna make this one for Greg. So this is text and we are going to have our pen draw, write, this text onto our certificate, along with my signature there. So there’s a few issues right away, as you can tell. That’s not gonna fit on our certificate. Also, I don’t think the pen is gonna write that. We need, and also it’s like, not even like centered or anything.
ESA's new dimension in printed circuit design - European Space Agency
ESA's new dimension in printed circuit design.
Posted: Mon, 30 Oct 2023 07:00:00 GMT [source]
How to make a Christmas ornament with Cricut
They’re not just writing, usually. One, we need to resize it so it fits onto our yellow certificate card. All right, so let’s first resize it.
I’m not gonna do that, and I also want a writing font. So what I’m gonna do is go up to the filter menu here in the upper right of that font menu. And I can sort these fonts by multi-layer, single layer, and writing, and we’ll save for offline too, but we’re not doing that right now. So I’m gonna click writing and it’s gonna show me only fonts that will have a writing option.
The best laptops for Cricut makers - Creative Bloq
The best laptops for Cricut makers.
Posted: Wed, 14 Feb 2024 08:00:00 GMT [source]
We need the writing font, the writing style. I’m gonna select that and it’s gonna change, so it actually changes quite a bit. So this here is, and those Gs are just the way they are, it’s just the style of the font, it’s not a mistake. So this is still a little bit too big. Once you change the font, you’ll get changes like that happening, but that looks good.
So let’s undo all the way until we no longer see that line and we’re back to our two layers. And I’m gonna select them both again by clicking and dragging around them. All right, our next choice is to weld. Now, if we weld, it will actually put them together permanently, which is what I’m looking for.
If we click it, we get access to all of the fonts. Now, just like with the images, we can tell when a font is available for Cricut Access with the little green symbols that we see here. And when it’s not and it costs money, there’ll be a price at it. It says, oh, it’s a Disney font. So this font, if I wanted to use it, I’d have to pay for it.
Cricut Joy has a simpler app you can also use, to help you create quick projects on the go. Find out more about the Cricut Joy app here. We demonstrate how to use the Offset function in Design Space to make projects, including a cake topper and sticker. This series of mini-lessons goes beyond surface level to show you how to work with images in Design Space like a seasoned expert.
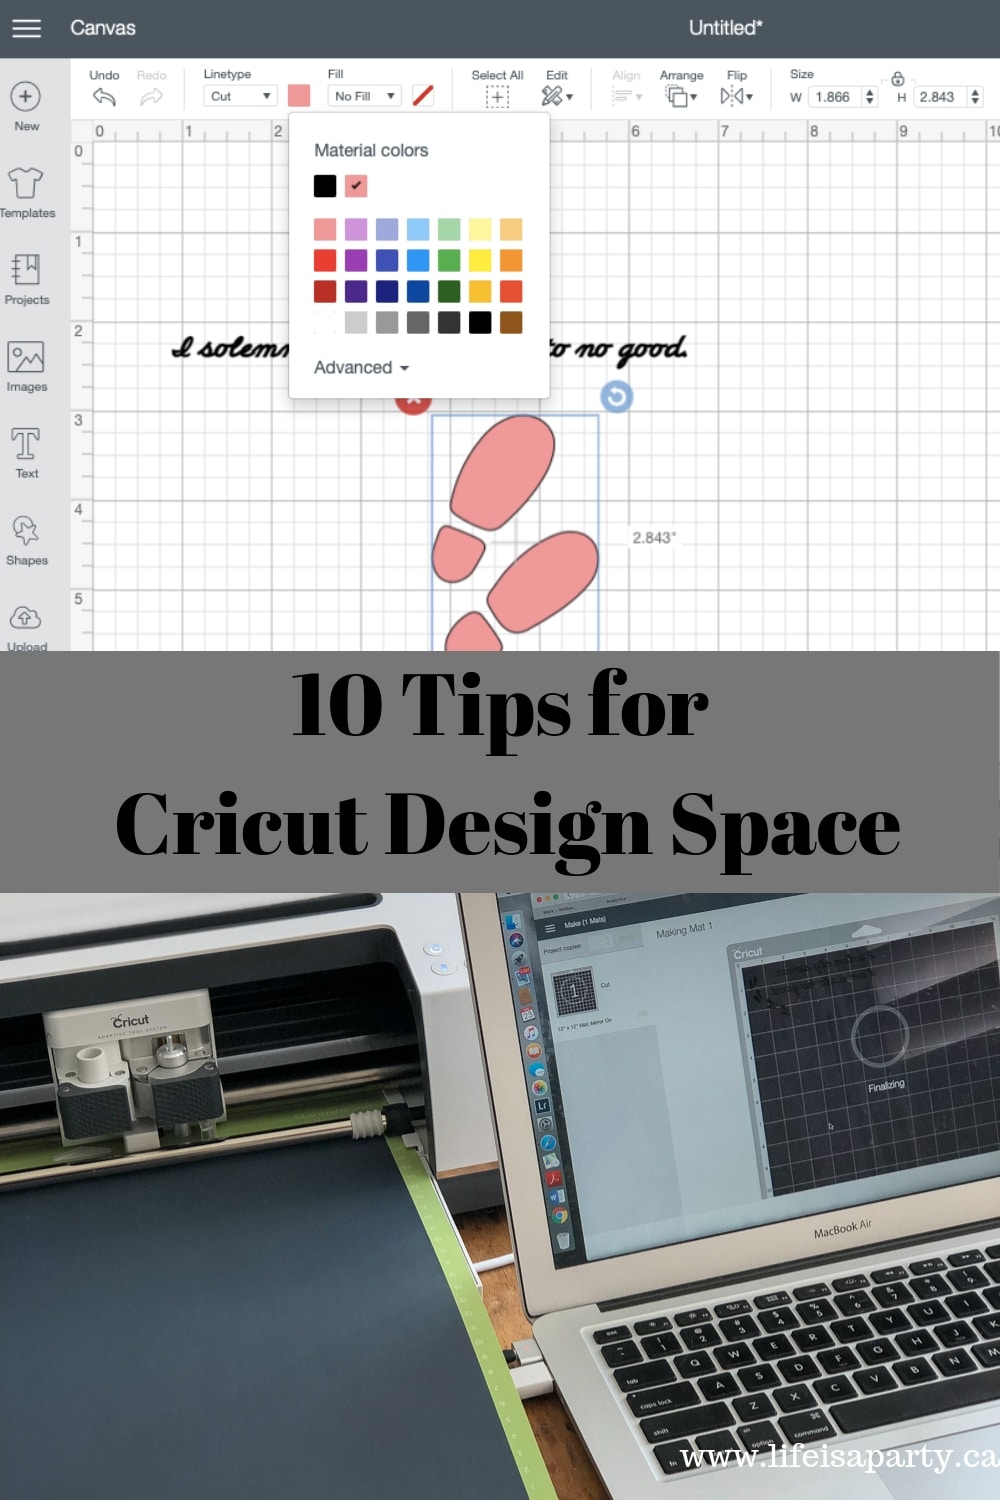
Canvas is where your projects are designed. Learn about all of the icons and tools around the Canvas. Learn to navigate Design Space and use tools to create one-of-kind projects! Select a link below for instructions, tips, and tricks.
For text layers, it gives additional options like line spacing, letter spacing, font style, etc. Below that is a search bar you can use to find images, projects, and people. Move images between mats or materials or hide images without having to return to the Canvas. Personalize your projects with text! Learn how to add text, select fonts, and more. Linetype tells your machine how to interact with your materials.
Watch as Rabia shares best practices for sizing and aligning your designs on on the mat, and accurately placing them on your finished project. In this video, we talk about a terrific feature called Templates. Templates helps you visualize your project in context. That way, you can better design to scale.


No comments:
Post a Comment